Thursday, August 30, 2018

Throw Back Thursday - Maybelline The Nudes Pallet


Happy Thursday!! How has your week been so far?  I hope it is all going great for you.  Today we are taking a trip back to around 2013-14 ish...when Maybelline came out with The Nudes, which is their version of the Naked Pallet that Urban Decay had made so undeniably popular.  When I saw EmilyNoel83 post her review and tutorial, I knew I had to seek it out.  At that time, I believe the pallet cost around $10 US.  Which is not too bad of a price and quite reasonable for 12 pan pallets and especially compared to the $20 we have since seen with Milani.  But at the time, that was the most I had spent on a single drugstore pallet.  But I wasn't disappointed.  While a bit powdery, I still thought the shadows were a fantastic value. 

You can see just how powdery they can be from my pallet below.


So, today's Throw Back Thursday, I am going back to The Nudes and bring you a look that I was typically sporting at the time.  I hope you like it.

First up are the products I used.  I used the Maybelline The Nudes, Milani Dolce Pink blush, Maybelline Colorsensational liner in Purely Nude and the Loreal gloss in Nude Ballet.....there's alot of "nude" going on here with the products, but fear not, that's as far as the nudity will.  :)


So I first went into color #12 and dusted it all through my crease and then deepened the outer V with color #9.  I did pack the color #9 quite heavily on the outer v and blended upwards.


I went back with color #12 and patted it on the lid.  I made a little square to show you just where I did this at.  Next I went in with color #6 and patted it on the inner corner of my lid.


I put black pencil liner in my lower water line, then using color #9 I blended the outer half of the lower lash line with a pencil brush and then swept color #12 from the inner half over to the inner corner.  I again, made a little graphic for you to see where the shadows were put.  You want to make sure these overlap a bit to blend them. 


I went in with black liquid liner on my top lash line, mascara and then went for the blush.  I lined my lips very lightly (because the lip liner can be too warm with the gloss if you go to heavily on it) and then topped it with the gloss.

Then you have your look.


I have done this look many times over the years and still fall for it each time I recreate it.  I like the simplicity of it and the neutral tones.  This is a look you can go to the office with, a wedding, or a night out.  It's just a great basic look, but taken up another level.  

So, how did you like the look?  I completely forgot about that Loreal Nude Ballet gloss....wow, I forgot how much I like that gloss. :)

Well, that's it for me today.  I hope you liked it and are inspired to look in your collection and find some products you haven't used in a while and give them some love.  

I will be back again, soon.  Until next time, take care.

-Kim

Tuesday, August 28, 2018

Seaside Sweetie and Girl's Night Glimmer Look

Happy Tuesday!!  How are you on this gorgeous hot Tuesday?  I'm sittin' cool in the A/C and doing quite well.  Oh, you guys, I am on my very last assignment for my computer class this week.  I am so excited to be finishing that class up, finally!! I think that's why it's such a happy week for me.  Next week I'll be starting in on English Composition and I am thrilled....not sarcastically thrilled, but really excited.  English is my favorite subject to study...well next to history that is, so I can't wait to get started on the next class.  So that was just some random stuff about me that I'm sure you weren't interested in.  

Anyways, let's get to why you came here, cause it wasn't computers and English composition.


I was cleaning up the makeup room a bit this past weekend and stumbled upon two pallets that I forgot I had.  One is the Elf Clay eye shadow pallet in Seaside Sweetie and the other is one of the Maybelline City Mini pallets in Girl's Night Glimmer.  I wanted to do a three in one look with the City Mini like I have for all the other, but this one has proven to be a bit more difficult than that.  


It's filled to the brim with glitter (or glimmer is what they call it).  And I am stuck trying to get complete looks with this pallet alone.  While cleaning out the makeup room, I came across the Elf Clay pallet in Seaside Sweetie, which is a satin matte pallet that looked like a good fit to combine with the City Mini.  So that's the look I am showing today.  I hope you like it.


First up take color #4 in the Elf pallet and sweep it in your crease, but be careful not to go too far over towards the inner part of your eye.  Sometimes blueish colors such as these can bring out a blue tone to your inner eyes and make you look bruised.  So keep it concentrated on the outer third of the crease and V and blend just slightly over.


In the City Mini I used the color #6 and packed onto the outer half of my lid.  This is actually a gorgeous, deep color. This just amped up the look so much, I thought.  


Next I went with the color #2 and some setting spray and packed it on the inner half of my lid.


I went back to the Elf pallet and used color #4 and ran it along my lower lash line.  I also used a cream colored eyeliner in my lower water line and lined my top lash line with black liquid liner.


I decided I wanted the outer corner of my lower lash line to be defined a bit more, so I went back to the City Mini and color #6 and an angled brush and ran it from the outer corner to about midway in.


I finished off with mascara, then used the the Loreal Color Riche lipstick in Freida's Nude and then used the blush from the the Covergirl Peach Punch Blush pallet.  And that complete's the look.


Well, that's all I have for today, I hope you enjoyed it and will come back and visit me again here at 523.  I will talk to you all again, really soon.  Until next time, take care.

-Kim

Monday, August 27, 2018

Boxy Charm August 2018

It sure is a Monday....am I right?  Well, Mondays are good though.  Caleb and I go see my grandmother on Monday's and Caleb practices his reading to her.  It's kind of like hitting two birds with one stone, whereas he gets to practice his reading for his homework and my granny loves to hear him read and visit with her.  So Monday's aren't bad for us, they are just a little tough to get moving at first. 

Today however, we are going to the hospital to visit granny today.  When her stay is over, we believe that they will be putting her in a nursing home for her care.  I had offered for her to come stay with us, but we were told that she needed 24 hour care and being that the hubs and I both worked, it wouldn't be suitable for her to be by herself during the daytime. 

While we are all sad to see her leave her home, I think knowing there is a round the clock care for her, makes us more at ease.  Plus we can come and see her at the home anytime we want, it's no farther of a drive than her house.  I think that she's at peace with going because she has friends who already reside there and mostly she won't feel so alone anymore. 

Well, that's enough of that for today, let's talk about why you are really here.....It's time to show off what I got in my Boxy Charm box for August!!


I must say that I had been secretly thinking to myself, "they always seem to put eye shadow pallets in the box, but they are always neutral....why won't they pick some color".  Well my friends, I got what I deserved....just look at the bright colors of this pallet.


I guess the Law of Attraction took me very seriously.......I manifested some straight up colorful shadows this month.  LOL

So this is the Laura Lee Los Angeles Party Animal pallet, and it list for $19 US. 

These color of shadows are not common in Boxy Charm...at least not for my boxes.  I was a bit taken back by how bright the shades were, but I went into playtime mode and made a look that I actually love.  I did bring in a neutral brown color to use in my crease though.  And even with the brightness of the colors, the look I made was still manageable (for my taste at least) and I was perfectly happy to leave my house with the boys and head off to the Marvel Universe Live show last Sunday wearing this exact look. 

The quality of the shadows are nice, especially for the yellow and two blue toned ones.  But it seems as the farther you go back, the more flaky and hard panned they became.  The orange was ok, but the pink and purple were not soft at all and you can see the flakes on my arm from the purple shade. That one purple shade wasn't too easy to work with, because it was so hard and gritty.  But I did manage to get it on my eye and then clean up afterwards. 

Moving on, the item next is the ncLA So Rich Lollipop Cuticle Oil that retails for $18 US. 


I wasn't super excited for this item.  I use lotions multiple times a day and my cuticles are never really in need of much extra care than that.  But I did put it on my nightstand (next to my lotion) and have been using it for the past two weeks.  To be honest, i really don't notice anything.  But again, I use lotion multiple times each day, so I don't think my cuticles could get any softer than they already are...but I will keep using it.  On the plus side, it smelled fantastic!! I have never had cuticle oil smell like vanilla cupcakes...I liked that part of it.  LOL

Next up we are going to dive into another item that I didn't care too much for.  It's the Wander Beauty - Baggage Claim Golden Eye Mask.  They retail for $13 and it includes a set of 3.


These are super cute to look at.  They are really a reflective gold color and just remind me of that gold paper that people use on crafts....I can't think of what it's called, that flimsy stuff.  Anyways, these are very golden, but like the cuticle oil, I am not one who has issues with bags under my eyes, blue colored circles or puffiness really.  I mean, I do get puffiness when I have a bad allergy day, but for the most part it's not something I have an issue with.  So while I did use them and they felt nice on the skin, I just didn't see a difference. 

One thing that I did not like however, was that they were a little hard to take off.  I don't know if I kept it there too long and it dried or something, but it wasn't a nice gliding off like most eye mask would.  I don't do the tugging of the eye thing.....and I had to with these.  So they are a no go for me.

Next up is the Bang Beauty Chocolate Eyeliner.  It retails for $22 US. 


Ok, this was a winner and a fail at the same time.  I could not use this as an eyeliner.  It did not glide across my lid hardly at all.  I have used $3 potted eyeliners that were magical unicorns dancing in the sun compared to this one.  (How'd you like that analogy?)  It was too dry to be an eyeliner.  BUT, the box said it could be a cream eyeshadow and a brow pomade.  So that's just what I did.  I used it as my base for the colors of the eye makeup look I did.  My shadows didn't crease and they stuck quite nicely with the tackiness of the potted liner, so I can't complain about it being a cream shadow.  But I was more impressed by the brow pomade.  I did my brows with the liner in the photo above, and I really think they turned out nice.  I think the color was a smidge too warm for my natural brows, but overall it was a great product for my brows.  

Alrighty, let's talk more fails, shall we?  That's just dismal of a tone. 

Now the next fail had nothing to do with the product.  It's the Becca Light Filtering Brightening Primer that retails for $18 US.  

When you sign up for Boxy Charm it will ask you of your skin texture, tone, etc.  As usual I put that I am oily skinned.  They had sent some people the Becca matti-fying primer and others the skin brightening primer.  I got the brightener.  


I was bummed...but I used it anyways.  I thought that it helped to blur out the pores some, but I am not seeing the brightening part.  It looked to have a little glow or something in it, but it wasn't glitter.  So I don't know, but I think that it was preconceived thoughts because I wanted the matte on instead.  

Okie dokie, last item I received was the Smashbox Be Legendary Lip Pigment....and was it pigmented.  Retails for $24 US.  


You will see in the photo above where I applied it to my lips and blotted it twice afterwards to give me the rosey color, that is still very bold, but much lighter.  But in the swatch it is actually very dark and rich in color.  I like the color of this pigment, but it's not a liquid lipstick, it's more like a very richly pigmented gloss.  So you have the bold color that a liquid lipstick will give you and the comfortable feeling of a gloss....HOWEVER, you will be constantly checking to make sure it's not a smeared mess very often because it is not a stay in place type of product.  I don't personally like glossy type formulas in bold lip colors, they are too much hassle and worry for me.  But if it were a lighter color, I'd be all over this product.

And there you have it friends, my Boxy Charm for the month of August.  My total value of all the products added together was $114 US.   That's not too shabby for me, especially if I only spent $19 US for it. 

I am overall happy with the majority of the products, some are going to the "niece basket" (this is where I put my stuff that I try and don't like for my many makeup loving nieces to try out).

Do you subscribe to any box subscription?  Let me know in the comment section below.  I'd love to know what your favorite products are in your subscriptions.

If you want to check out  Boxy Charm for yourself, I will leave my link below.  There is no pressure to use it, but if you do, thank you so much!


I will be back again soon, until next time, take care.

-Kim


Friday, August 24, 2018

Ipsy Bag for August 2018

Happy Fri-YAY!! 


I have to tell you my story of what happened last night.....I am nearly finished with my computer course for my school and I was taking an open book test.  Normally I can finish these within about 30-45 minutes....last night it took me almost 3 hours to finish.  I was so cross eyed from reading and looking over my answers....the worst part was that during m sleep I was actually dreaming about computers.  Oh, the horror of that dream!!

I just can't do computers and there makeup, it's just not something I'm interested in enough to keep my attention....especially for 3 hours.  But nevertheless, I finished and I'm glad that part is over with. 

Well, enough jabbering about computers, let's get into the Ipsy bag for August 2018.

This was a pretty good bag, not the best, but still good.  It's theme is "Selfie with no filter".  Which is such a beautiful theme.  This month I received a full size highlight, full size eye shadow color, full size lip gloss (that is unbelievably adorable), a highlight brush and a travel size facial mask.


The first thing I want to talk about is the Ciate Glow To Highlighter.  It's very creamy for a shadow formula of highlight, and as you might see my face below, I was a bit taken back by the intensity of it on first swipe. It has a very silver hue to it and being this pigmented, I think this would be great for someone who either loves blinding highlights or as an inner corner highlight to compliment your eye look.  My only gripe is that it comes in this plastic package and I can't seem to get it out to get it in a makeup pallet.  I am going to keep trying, but for now, it's staying in it's box.


Since we are on the highlight, let's go ahead and talk about the SLS Miss Glam highlight brush.  I am always amazed at how beautiful her brushes are.  I have never had one shed or feel plastic like, they have always been high quality bristles and very soft.  This one is no different.  BUT on top of all that, it's PINK!! It has a pink translucent handle with glitter all throughout it, a gold ferrel and then she tops the ferrel with pink rhinestones.  I have gotten more and more excited about getting brushes when they are a beautiful and high quality as Miss Glam's are.


Moving along, we are gonna talk about The Balm's foiled eye shadow next.  The Balm has always impressed me on their shadows and this is the same, but to be quite honest, I was underwhelmed with this shadow.  It looks like a beautiful pewter color in the pan, but when applied it's more of a lighter silver instead.  Now, if I was wanting a silver shadow, then this is perfect.  But it's just not that dark on the eye as it shows in the pan and I got excited when I saw the color in the pan. 


Next item I was excited about.  It's the absolute cutest thing in the entire bag.  It's the Glamour Dolls Sweet Treats lip gloss in Peach.  This is actually a very nice gloss.  It has a nice pigment to it, but not like a lipstick type pigment, just a light glossy, peachy look.  This type of color can be tricky because sometimes they can look milky and streaky on the lips, but this one did not do that.  And who can really argue with how precious this is?  It reminds me of lip glosses I had as a child, in little cute containers.  This was a win for me.


Last item I received was the Hey Honey Youth Boosting, Honey and Copper Peel Off face mask.  I'll admit, I already had preconceived thoughts on this.  I do NOT like peel off mask.  I think that it's more use error than anything, because I get it all over the place, stuck all in my hair and then I'm too impatient to wait for it to dry in order to peel it off.  When I happen to actually wait enough time, it seems to hurt when I do peel it off.  So I just don't like any types of peel off mask and this one wasn't any different.   And again, this was primarily from user error.  This could be a great facial mask but sadly I will never know. 


And that's all I have in my August Ipsy bag.  My hits were the gloss and the brush for sure and the eye shadow and highlight followed behind.  The face mask is just not for me so it was a miss, sadly, but I think overall it was still a good bag.  

That's all I have for today.  If you subscribe to Ipsy, let me know what you got in your bag.  I'd love to know.  

I hope you all have a great weekend and I will see you all again soon.  Until next time, take care.

-Kim

Thursday, August 23, 2018

Throwback Thursday using Maybelline's Green With Envy pallet

Happy Thursday!!  I am here with another throw back Thursday post.  This is where I pick something from my stash that hasn't been used in a long time and use it in a tutorial.  In today's TT I'm breaking out the Maybelline quad called Green with Envy. 


I remember buying this a few years back and just adoring the colors and how easy they are to work with.  And, since we have been having low 90s weather here in Texas, it has started to make me think Fall (I know that's not close to Fall, but it is here in Texas), so I thought this is a perfect Fall look to do.

First up you will want to take the color C and pack it all over the middle of your lid with a flat brush.  I turned the brush over and used the color A to pack on the inner third and the tear duct area.


On a small fluffy blender, used color D and apply it in the outer V and outer third of lid.  This would be a great time to take another clean blending brush and just lightly go over the edges of the crease area to blend it all out.  With a wispy brush, take color B and run it lightly in the upper crease area, just on the border of the green crease colors.  This will help to bring the green down a notch and add a bit of dimension to the eye look.  It's a small step, but the effects of it are big.


I used a nude eye liner in my lower water line.  Then on an angled brush I used the color D and ran it along my lower lash line from the outer corner to the middle of the eye.  With the same brush I used color C and ran it from the middle of the lower lash line to the inner corner. 


My typical black liquid liner on the top lash line was used and multiple coats of mascara and the eyes are done.

For my cheeks I went with Maybelline Fit Me blush in the color Medium Coral and for lips I used the Rimmel Stay Matte Liquid lipstick in Rosetto. 


And there you have it, your look is complete. 


I really think these little Maybelline pallets are at the top of their game in drugstore pallets.  They can be a bit dusty but with a little tapping of your brush you can create beautiful looks with the pigments that these shadows have.

I hope you enjoyed today's Throw Back Thursday and will come back and visit me again here at 523.  I have been working on my Boxy Charm review and my Ipsy bag this past week.  There are some fun stuff in those two packages this month and I can't wait to show you just what I did with them.

That's all for today, I hope you have a beautiful Thursday and until I see you again, take care.

-Kim

Wednesday, August 22, 2018

Is this not Pikachu? Caleb says "nope", but I disagree...Pikachu inspired tutorial

There is some serious Pokemon debate going on here at 523....and I need your thoughts.


I had done a couple Pokemon inspired makeup looks, Jiggly Puff and Charmander, and decided it was high time to do a Pikachu....and while I thought I had done a pretty good job, Caleb was like "um, no mom, that's not a Pikachu....I don't know what that is".  Yep, straight from my 8 year old's mouth...  Can we say  #heartbroken

Has anyone else gotten shut down by their 8 year old?  It's pretty demoralizing for sure.  But nevertheless, I will not let that stop me from showing all of you what MY version of Pikachu inspired makeup looks like....I hope you enjoy.  And if not, please go easy, my self esteem is at an all time low from Caleb's comment.  ;)

Let's get started.....the products I used were the Maybelline Lemonade Craze pallet for my eyes, my cheeks I used the Maybelline Bouncy Blush in Hot Tamale and for lips I used the Covergirl Oh Sugar lip balm in Punch.  I wanted to really go off of Pikachu's cheek color with the lips and cheeks.


I went "old school" on my tutorial today, since my photos didn't come out of me in the process like I typically like.  Again, remember this is not a "face painting" type of look, it's an inspired by look....I have to be able to walk out of the house wearing this makeup, so keep that in mind. 


And there you have it...my version of Pikachu, 523 style. 

What did you think?  Do you ever get inspired by fictional characters?  I think this stems from the fact that I am constantly tripping over, dusting and finding in random places (like my bed) Pokemon figures, and for the past four weeks our bedtime stories have all been Pokemon related....I think I'm getting so well versed I could almost play the Pokemon card game...and possibly win. :)

Now, back to that sweet baby cakes of mine who does not like my Pikachu....we took Caleb to the Marvel Universe Live show on Sunday.  We didn't tell him where we were going until we got there.  But the funny part was that we parked by the Water Gardens in Ft. Worth and I told him that's what we came to see.  He wasn't too thrilled but then we went to the front of the building and he then saw why we were actually there for, so he was super excited.  I figured I'd show a couple photos of him below at the show. 


Well, that's all I have for today. I hope you enjoyed and will come back and visit me again here at 523.  I will be back again tomorrow with another Throw Back Thursday...I'm excited about tomorrow's post.

Until next time, take care.

-Kim


Tuesday, August 21, 2018

Wet N Wild Zodiac Collection Review and Tutorial


Happy Tuesday!!

I'm so excited to be here today and I hope you are too!!  Caleb is on his first official FULL week of school this week and his poor teacher is already having to be out.  He was bit by a brown recluse spider over the summer and is having additional issues due to it.  I hate that for Caleb's teacher, because he's an incredible teacher and Caleb benefits so nicely being in his class.  So we are for sure keeping him in our prayers in hopes for a speedy recovery and to be back at school soon.

Okie, dokie....Today, I wanted to bring you a review and a look as to how I used the New Wet N Wild Zodiac makeup collection.  After BH Cosmetics released their Zodiac pallet (one which I am putting on my Birthday list), Wet N Wild jumped on that wagon and took off too.  They came out with glosses, highlighter bars and small eye shadow pallets. 

So I purchased one of the eye shadow pallets, one highlight bar and two of the lip glosses.  They were all the Virgo / Earth signs....well because a Virgo is Earth and I am a Virgo...so anyways, that's why I purchased those.  HOWEVER, I was smitten with the pinky colored gloss which has nothing to do with Virgo, but I loved the color and bought it anyways.  :)


So here we go....

Let's first talk about the glosses.


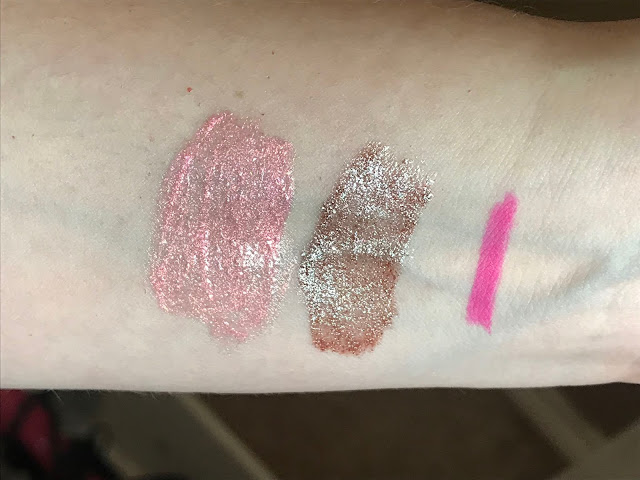
The pink color is called Taurus and the brownish taupe is called Virgo.  These are gorgeous in their container.  I was immediately drawn to the Taurus...although I was "supposed" to be drawn to the Virgo, but I wasn't.  Anyhow, they are beautiful in their tubes, and swatch quite nicely as well.  

But the trouble comes with the texture of them.  They are so grainy because of all of the glitter, that it makes it difficult to wear.  

They wear about the same amount of time most glosses wear....so maybe an hour as long as you don't eat or drink....but again the trouble comes from the glitter.  All that is left is a glittery mess when the actual gloss wears off.  


I wanted so badly to like these glosses but I didn't.  I really wish they would have came out with these two shades in the Cat Suite liquid lipsticks.  I love that formula and would have gladly accepted those in place of these glosses.  But it's not up to me....

So the glosses aren't something that I will be using...and it's really too bad because the colors are beautiful.

Next up is the highlighter bar. I got this in the color Earth....which is supposed to be Virgo's thing...or something like that...I really don't know that stuff.  But I do know that this thing is massive!!

Who needs this much highlight?  Of course the question could also be asked, "who needs as much makeup as I have?" ....but we won't ask that question, will we? :)


Okie dokie, I do really love this highlight.  It can be soft and subtle but it can be loud and slap you right in the face just the same.  While I do like a lot of different highlights, I feel that the golden colored ones compliment the skin (at least my skin, that is) quite a bit better than most other colors.  And that's just what this highlight bar is.  It's not a special color per-say but it's got some sort of......something....I don't know the word I'm looking for.  But there's something going on with it that makes me really love it so much.

Alrighty, lastly we have the Color Icon Eye Shadow Pallet in Virgo.


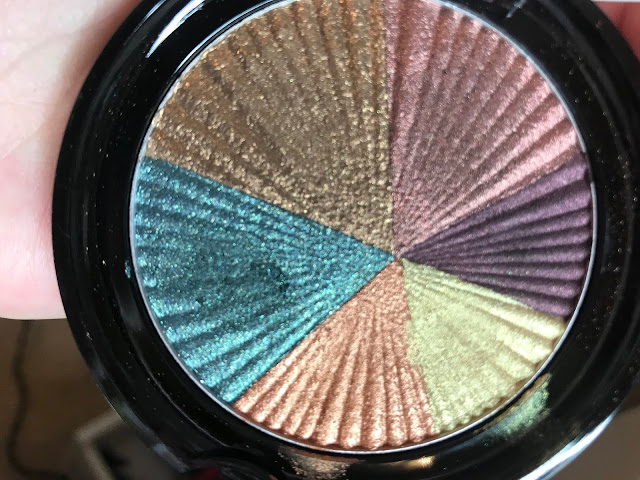
When you look at the swatches in the photo above, they really look extremely promising.....It hurts so much to say this but, I just wish so much that was the true case with these shadows. 

They just didn't perform on my eyes like I wanted them too...I was extremely disappointed in their blending.  And then when you applied the darker colors they just muddied up the look.  But doesn't that teal on the end look so gorgeous in the swatch?  And how about that lime green?  I'm a sucker for lime green.  WHY COULDN'T THEY HAVE BEEN BETTER FORMULAS?! I'm starting to tear up a bit...

 I don't understand why Wet N Wild does this sometimes with their limited edition stuff.  I don't see why they just won't use the same formula of shadow as the regular ones they have out?  Maybe there is something I surely don't know about cosmetic production and it could be harder than it really seems, to make colors like these perform like their other pallets on the regular line.  I don't know, but while I got a decent look from them finally, it took me many tries to get it there.

So, let's take a look at how I got my look. I first went in with the Rose in the Air pallet and color number 6 in the crease.  And then number 9 was used to darken the outer V.


Next I went in with a flat brush and packed on the teal color all over my lid.


Afterwards, I used a black pencil liner and lined my lower water line and then with the teal color and a pencil brush I smudged it out.


I used the highlight bar in my inner corner for some much needed brightness.


I used the color number 2 in the Rose in the Air pallet for my brow bone highlight.


I did black liquid liner on my top lash line and heavy coats of mascara and the eyes were done.

I used the brown Virgo lip color as my choice with the look and I actually loved the color it gave, but it just felt so grainy and then when the gloss wore off it was  glittery mess.  But still beautiful color.

So I do like the look I finished with, but it took many tries to get a look I actually thought was good enough for the blog.  Some of the looks I came out with, I didn't even leave the house without re-doing it.  That's how hard of a time I had with the Zodiac pallet. 


For my final thoughts.....

I love the highlight and everything about it.  The glosses, while beautiful, are not something I'd reach for because of how they feel when wearing them and how they wear off.  I think I'm going on a hunt for a color similar to the dark brown lip gloss but in a lipstick form....I'll let you know if I happen to run across one.  Then the shadow pallet....it breaks my heart that this turned out to be how it is.  I wanted so badly for this pallet's colors to be true to swatches....sadly they were not.  I am not one who gives up though, I have one more look I'm wanting to try before throwing in the towel all the way. 

So for now my recommendation is to save your money and hit up the BH Cosmetics Zodiac pallet instead of the WNW.  Unless you are going for the highlight, in which case I'd say "go for it!!"

That's all the makeup talk I have today, I will see you all again soon.  Until next time, take care.

-Kim