Showing posts with label Makeup Tutorials. Show all posts
Tuesday, April 16, 2019
Blue and yellow is an ok fellow 😕...I might need some help on the title.
Ok, I had a hard time coming up with some sort of catchy phrase for my title....so, unfortunately "Blue and yellow is an ok fellow" is kinda what we are going with. 😏
How have you been? Is life just crazy for you? I can't get past the fact that Caleb has only 6 weeks of school left until he's in the third grade....😭....I'm not happy about it, not one little bit. I hate everyday that he grows older...it makes me cry. But, as Caleb constantly reminds me...."mommy, I'll always be your little boy". 💓
So, how was your weekend? Whew, mine was a whirlwind....again. On Saturday we did quite a bit of fun stuff. It rained all day long, so Caleb decided that even though it was in the 50s that he was bound and determined to play in the puddles. Along with my little sis and her two girlies, we went to Michaels craft store. They have these kid's crafts every Saturday, so we attended that. They made a bunny out of a small flower pot, bunny glitter slime (I do NOT recommend), and then they sent them on a scavenger hunt throughout the store to find different items and bring back the list checked off for a prize.
Seriously, I know what they were doing with the scavenger hunt....I would have bought the entire store out, if I didn't have my wits about me.
This scavenger hunt sent us through the Easter decor and then we went through the home decor aisles....but, no Michaels...I know that ploy, you will NOT get me to buy that cute farmhouse sign decor....even if I did imagine how beautiful it would look in my kitchen and even though there were many tears after leaving empty handed....
I might be back there tomorrow...
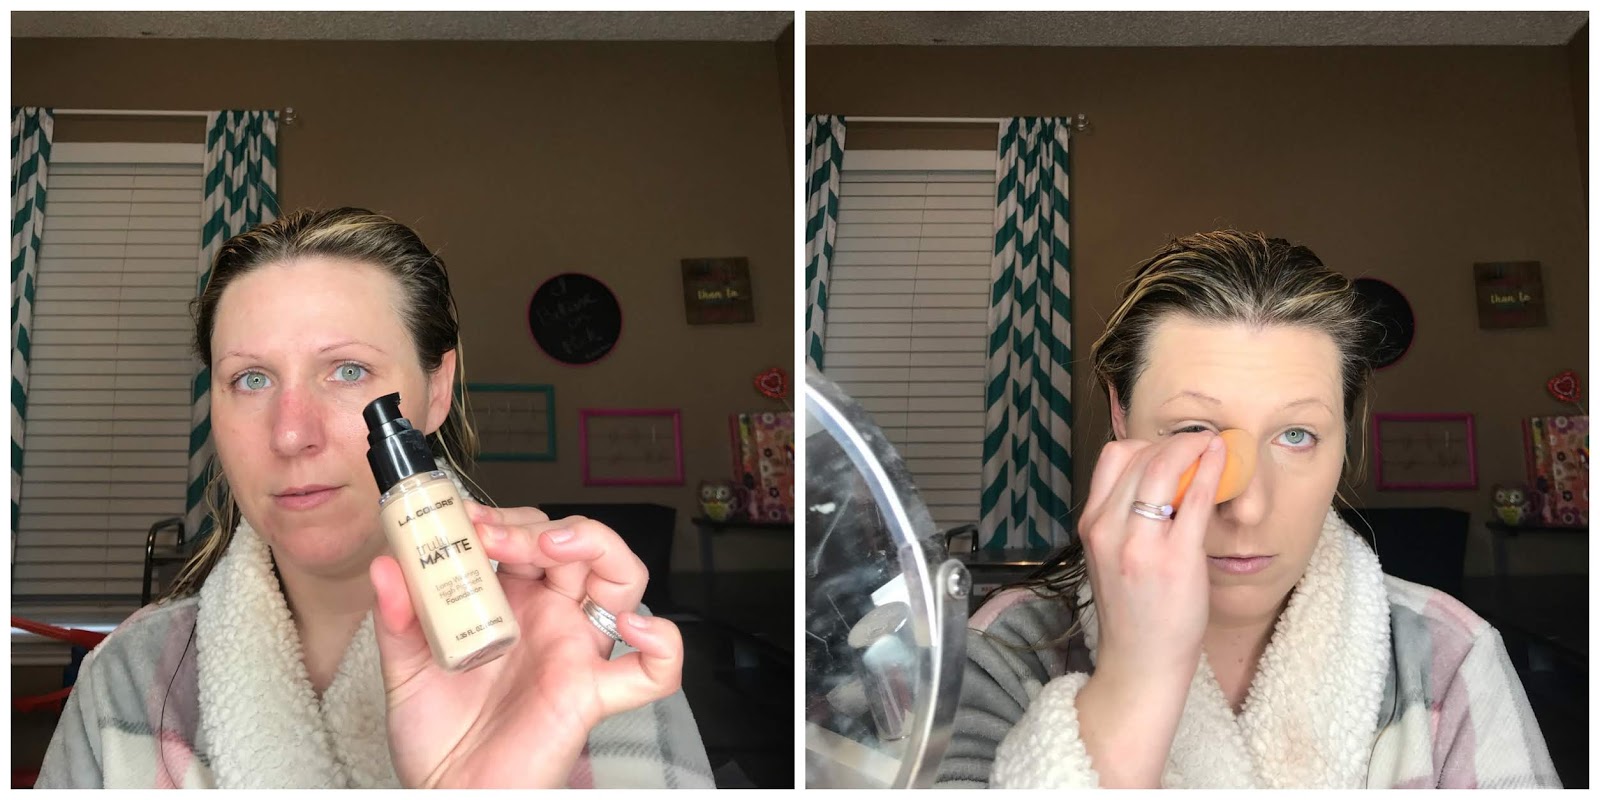
Okie dokie, I am dipping back into my Rimmel Jewel Rocks pallet today.
Sometimes, I get caught up in doing the same thing....even as a beauty blogger who is always trying new things...this just sometimes happens. With my crazy schedule right now, that's how it has been for me. So today, I decided to go back to my easy but colorful look that I have come to really love, and I wanted to show you just how simple it is to create.
Most people do not think about yellow as being an eye shadow shade they are comfortable wearing. I think it really depends upon the tone of yellow first and foremost, but it's also in the way its executed on the eyes that determine how the look comes out as well. I did this yellow and blue look quite a while back and have since worn it several times over....it's so simple you will pinch yourself in disbelief.
So, let's hop to it...
First up I went in with the matte yellow shade from the pallet and swiped it all throughout my crease. I went in with a couple coats to get the intensity I was looking for. But you could do a light dusting if you are hesitant about a yellow eye look.
Next I used one color over, the yellowish golden shimmer, and swiped it all over my lid.
I think I might have said before, that you want to swipe these all the shimmers in the pallet, as opposed to patting, to get the best application. Or you can use your finger or even a wet brush application. They really work so well with those three application methods. But patting it on will result in an overlay of shimmer and not too much color.
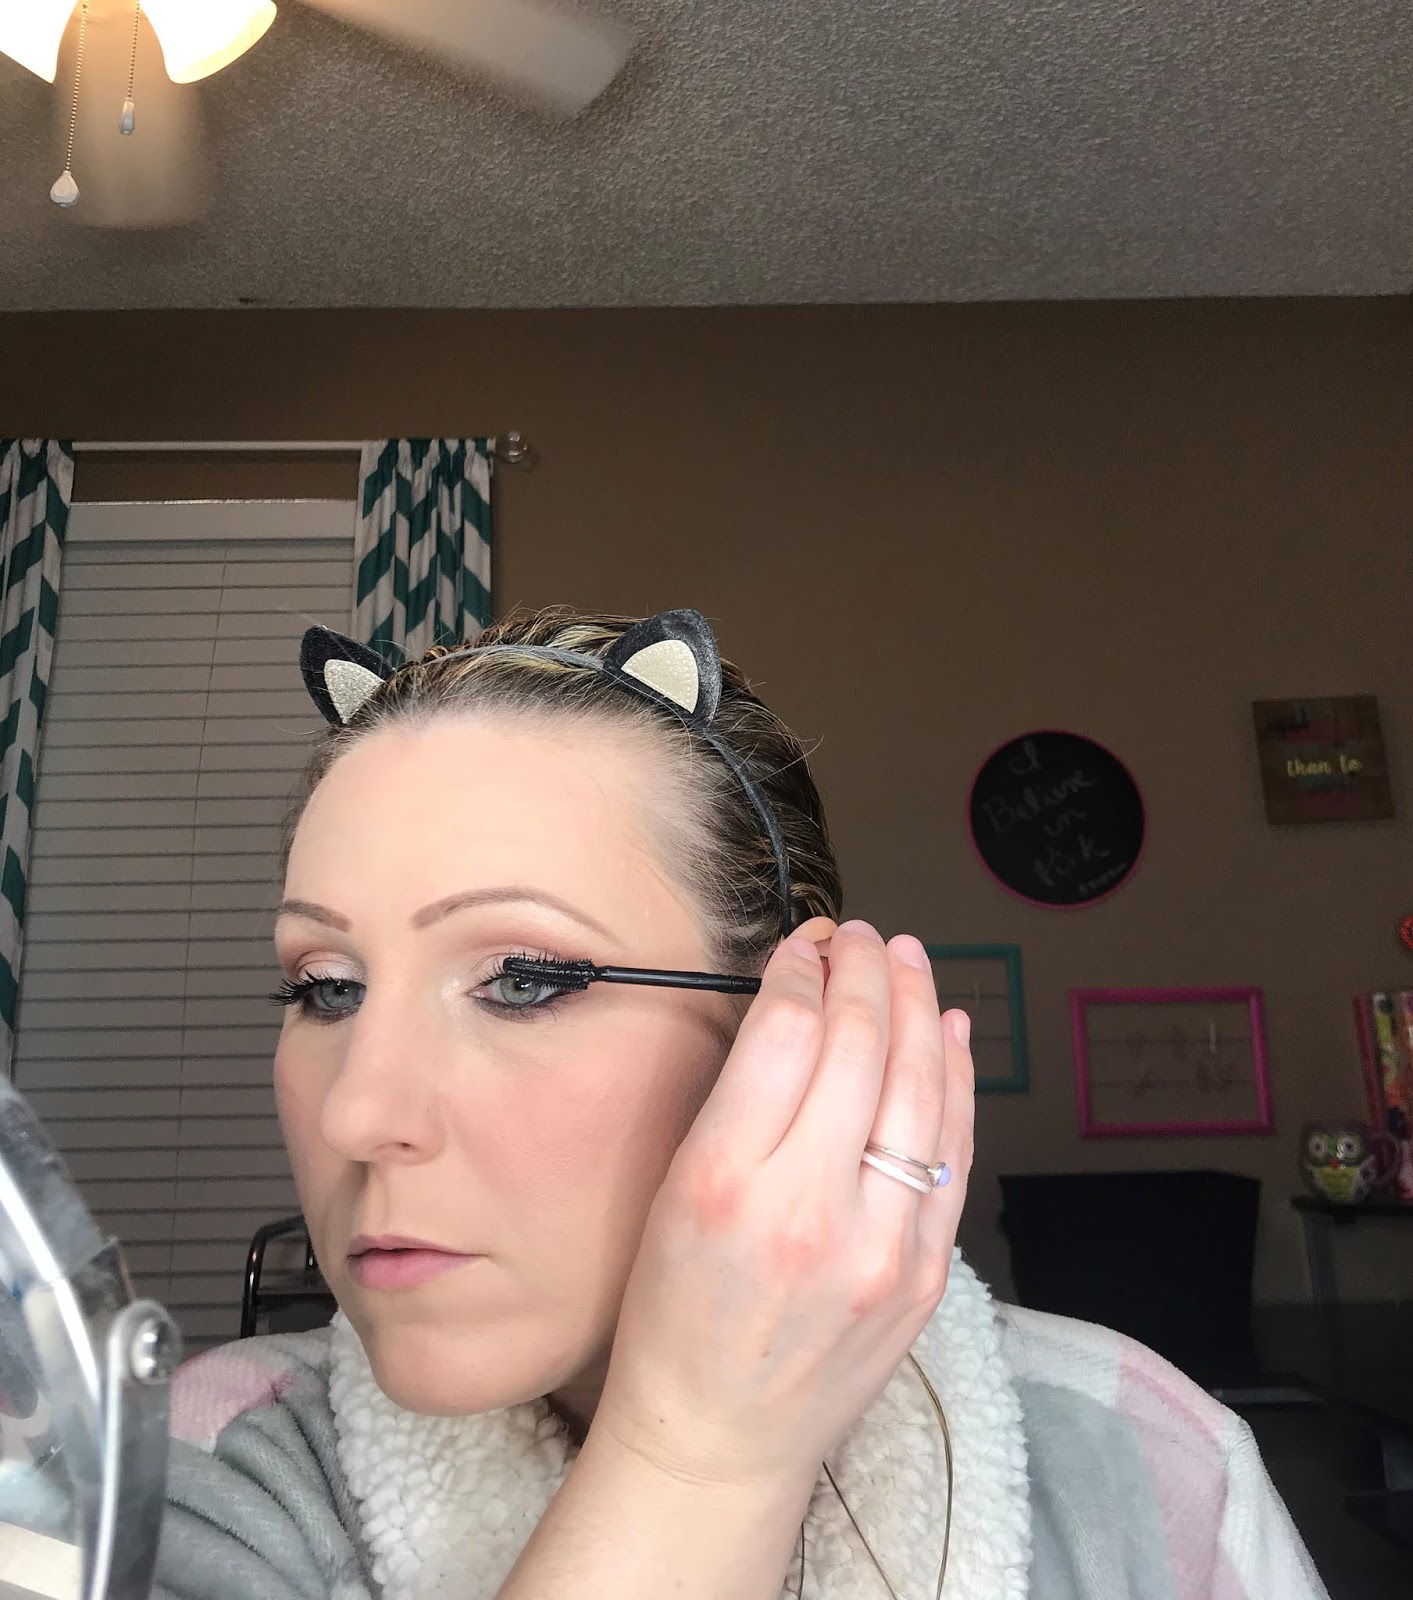
Next, I went in with a blue pencil liner, this one is by Loreal in Cobalt Blue, and I put it directly in my lower water line.
Then I used the blue color in the pallet and ran it along my lower lash line to smudge out the liner.
I finished up the eyes with black liquid liner on the top lash line and a few coats of mascara and moved on to the face.
I decided to go easy on the cheeks with the blush and went for the very neutral Bellisimo Bronze from Milani.
Then I used Maybelline's Clay Crush matte lipstick on my lips, and topped it with Milani's Lip Plumping Gloss in Prismatic Peach (BTW: No, this does not plump my lips, I'm pretty sure it's just an optical illusion, LOL)
I love the way the look turned out....I thought it was a fun and easy look to create and to be perfectly honest, it's not a look that I feel is way extreme or "in your face kind" of look. It's a subtle colorful look....at least that is my thought on it.
So that's all I have for today....we are picking up part of Caleb's first communion suit today...the jacket has to be altered still, but it will be ready next week. I swear that was the biggest fiasco I think I had ever been in when it came to clothes shopping. We went to five different stores and I am pretty sure I was shedding tears in each and every dressing room we were in.
I'm so happy to have remembered the Men's Warehouse, and their assistant manager, Jonathan was there to help me out. I spent more than I had been hoping for....um, by quite a bit, but fortunately we did have the money for it, and I am getting what I want, Caleb is getting fitted exactly for it, and it will all be ready by May 2nd like we need. So, NO MORE TEARS!!! Yay!!
Well, that's all I have for today, I hope you enjoyed and will come back and visit me here again at 523!! I will talk to you all again, really soon.
Until next time, take care!
-Kim
Friday, April 12, 2019
A Lazy Day....the 523 Way!! 😄
It's been a total whirlwind of stuff here at 523....as I spoke about on my last post, the house is a wreck, Easter is only a week away, school commitments and first communion are all sweeping in and must be assessed, planned and then executed. There are just few (and I mean a VERY FEW) hours or if I'm lucky half a day to just veg out and do nothing, lately. You have seen the blog....I used to post upwards of nearly 5 times per week, then just two and now all you hear from me are crickets. So, I'm a busy girl...that's the point I'm getting at. But for the rare occasion that I get to stay at home and not do a darn thing, I wanted to show you my makeup look for those special times.
While I am one who is going to STILL apply makeup, even if I don't leave my couch for the weekend. And just for reference, yes, I have actually asked Caleb to "run to mommy's makeup room and grab the stuff on the table" and then proceed to apply my makeup from my couch.....shameful, I know.
BUT, that was only once and it was a long time ago....but anyhow, the reason for my ramble is that even if I don't leave the house, I will still apply a little makeup to brighten up my face a bit. Let's keep this real...I had the flu and still put on makeup just to stay at home. There's some definite issues that I should really address about my infatuation of makeup, but that's only if I "accept" there's an issue...I'm still in denial so I frankly think I'm ok. 😉
Again, I'm getting caught up in my rambles....so I apply makeup everyday no matter what. The reason? I don't want to walk by a mirror and scare myself, so I do what I can to make sure I feel good about what I see in the mirror. So, today what I'm going to show you is my "lazy day, 523 way" of makeup....I hope you enjoy.
I will most definitely forgo the liquid liner on days like these....I love the look of it, but sometimes you just gotta make sacrifices in the name of simplicity.
Oh, one more thing....you will see a huge mess of toys in the background...please pay no attention....Caleb's toy room moved into the makeup room until the flooring is done. 😖
Ok, well I will always start out with making sure I have either foundation or a BB cream. Then I will set it all in place with powder and then fill in my eyebrows. These two steps are crucial to me feeling my best.
Next I grab a bronzer, for this day I used the Loreal Lumi Bronze It in Deep. Go a bit easy on this because it's very pigmented and dark.
I will sweep the bronzer in and all throughout my crease of my eye.
Then I take a dark brown pencil and run it in my lower water line and smudge that out with the bronzer on the lower lash line.
I curled the lashes and topped them with a ton of mascara and moved on to the rest of the face.
I used the Lumi bronzer as my bronzer and then I popped the Neutrogena Get Cheeky Blush in Boys N Berry on my cheeks.....this is such a fresh and beautiful color for any skin tone.
For my lips I used the Milani gloss in Luminous....it was neutral enough, shiny enough and had just a hint of color for the look I was going for.
I put on my makeup shirt, threw my hair in a messy bun and then went to sit on the couch with Caleb where we watched movies and then of course we had to leave, we had to go to a birthday party. I'm telling you, there is no rest for this girl....at least not until......hmmm, I think we might be free in June, perhaps.
It's a crazy life, but it's my life and I truly love every crazy minute of it. 💓
Well, that's all I have for today...I hope you enjoyed and will come back and visit me again here at 523!! I will see you all again really soon, so until next time, take care.
-Kim
Monday, March 18, 2019
Rimmel Jewel Rocks Pallet - Soft and Easy Coral
Hi everyone, how are you on this beautiful Monday? Spring break is over and I'm kinda glad. It wasn't quite what we were planning but we made it work. We basically fit all of our spring break activities into three days. So that was exhausting. But I'm glad to be back on our daily routine. I work much better with my days all planned out for me.
So, today we are gonna do a really easy look using the Rimmel Jewel Rocks pallet.
I did this look right after I first bought the pallet and woke up late for work. I didn't know what to do with it, so I just combined the shimmery coral and matte coral. And then went into the lightest shimmer for a pop of brightness.
Surprisingly I got a lot of comments on the look!! I couldn't believe how nice it looked and how quick it was to create. So today, that's what I'm gonna show off. I hope you enjoy!
First up take the matte coral color and sweep it all through your crease. Then take the shimmer coral color and swipe it on your lid. These shimmers work really well when you pick up the color and swipe it across as opposed to patting it on the eye. They are incredible when applied wet, just a FYI.
Next I went in with the lightest color in the pallet and swiped with my finger over my lid and then applied some in the inner tear duct.
Last I used the matte coral and ran it along the lower lash line and applied a few coats of mascara and the eye look is done.
For my lips I used Revlon HD Matte Lipcolor in Flare and my blush was the Milani's Bellisimo Bronze blush
And there you have it....a simple, easy, soft coral look.
Well, that's about all the time I have for today. I hope you enjoyed the easy tutorial and will try it out for yourself. But today that's all I got. I will see you all again really soon. Until next time, take care.
-Kim
Disclosure: Some links may be affiliate links. My thoughts and opinions are mine, the products were purchased by me and in no way does this link affect my judgement on the products mentioned.
Wednesday, February 27, 2019
Maybelline Diamond Dust - Tutorial #2
Hello and happy "hump day"! It is a dreary one here in North Texas. It's nasty, rainy, dark and cold today and it just makes me feel tired. Of course, I might also be tired because Caleb and I stayed up until 10 PM last night finishing off The Wizard of Oz book. We called it a "literary crime" to stay up that late reading a classic, but I just wasn't watching the clock, in all reality. So Caleb and I are both dragging around today.
So, today I am going to do another look using the Maybelline City Mini pallet in Diamond Dust. I really wanted to use the deep teal color in the outer corner, so I created a look all around making that area deep and teal. I hope you enjoy.
First up, you will see that I am using blotting sheets under my eyes. This is because the pallet is very soft and has a tremendous amount of fallout. So either use some sort of shadow shield or wait and do your foundation after your eyes.
I wanted to start out with my crease and the teal, but I wanted to keep it very light at first. So I used fluffy brush to swipe the teal color (6) throughout my crease. I used a very small wispy brush and ran the light gray color (5) just along the edges of the teal. I did this so I wound't have a very harsh teal line in my crease. (You could start out with color 5 and run it through your upper crease first and then go in with the teal to get the same effect if you don't have the wispy brush.)
Next on a flat brush I went in with the beautiful shimmer color (4) and packed it all over my lid. You can amplify it a bit more if you use a bit of setting spray on the brush. That's also what I did to get the deeper teal color in my outer V. I got some of the color (6) on my brush, spritzed it with setting spray and then packed it on my outer V and blended it over towards the crease.
I lined my lower water line with brown pencil liner and smudged it out with the teal color (6) on a pencil brush on my lower lash line.
I did black liquid liner on my top lash line, applied mascara and my eyes were done. I next used the Hard Candy Fox in a Box Blush in Girl Boss and for my lips I used the Loreal LaRouge in I Rebel.
I think the look really turned out quite pretty. I love the teal color and how it's not some wild and out there color, but a lot more fun than a neutral brown too. It has a nice, edgy twist to the look.
So, that's all I have for today, I hope you found it helpful and enjoyed it as well. I will see you all again really soon. Until next time, take care.
-Kim
Wednesday, February 20, 2019
Maybelline City Mini Pallet in Diamond Dust - Tutorial #1
Happy Wednesday!!
How are you today? I am doing really well. Caleb and I have plans to go to the park after school today and let him run his little heart out with a bunch of random kids....he's super excited!! :)
I, on the other hand am jumping head first back into my Ecology class and I will finally finish this stupid paper on the wind patterns and the heating of the Earth. I took a much longer break than need be after my grandmother's death and I need to get this finished soon so I can continue on. So while Caleb is playing I will be writing.
I woke up pretty excited today...and it wasn't because of makeup either....LOL Shocker, I know. I started dabbling around with stocks in my retirement account the past several months. I have a couple stocks that I have been heavily playing around with lately and actually started to make a somewhat decent payoff with them. But, with this type of investment account I have, I cannot use the money until I am 60 years old....I am far from that age. Something I realized was that I have a lot of fun playing with these little stocks, so I decided to open up a regular investment account. I have only started out with a very little amount of money, so its not something that we will lose our house over. But, I woke up this morning knowing that the account would be open and ready to trade stocks with today and I just got really excited about it. So there's you a fun fact about me today. Stocks excite me.
Ok, let's talk makeup.
I found ANOTHER Maybelline City Mini pallet at the store the other day and snatched it right up. So today, I am bringing you a look I created with it. It's a really easy look....I only used one shadow from it. But this one shadow is so gorgeous on it's own.
So, lets start....first up you want to take the shimmery color. And pat it on you lid....next with a fluffy brush, sweep the color through the crease. Lastly on a pencil brush, swipe the same color on your lower lash line.
I put black liquid liner on my top lash line and then many coats of mascara. I used Hard Candy's Fox in a Box blush in Girl Boss and for my lips I used the Loreal Gold Crush lipstick in Rose Gold.
And that was all there was to the the look...what do you think? Easy right?
I love super simple looks like these. If you don't want to use black liquid liner, then you can skip it and go with a more neutral look. I think a very dark purple lip would look fantastic with this eye look. But I wanted to keep it neutral.
Well, I think that's all I have for today. It was short and sweet....just like my sweet baby Caleb.
So, I guess I will see you all again really soon. Until next time, take care.
-Kim
Wednesday, February 13, 2019
Loreal Infallible 24 Hour Fresh Wear Foundation Review - Did it make the grade?
Hi everyone, how are you doing on this beautiful Wednesday? Even though it's 9:30am, I just had the most perfect and absolutely enormous cupcake I have ever seen. The size of it was like a triple sized cupcake. It was a decadent chocolate cupcake with some even more decadent chocolate icing.
Here at work one of our techs went to a location called Small Cakes to perform service for them and they gave him these gorgeous cupcakes to bring back to us here at work. Its one of those type of cakes that you eat it and it is so wonderful you keep eating until you are sick and then even though you are sick you are still smiling profusely at how delicious it was. Do you know what I mean? LOL
Anyways, now that you are craving cupcakes, let's talk makeup, shall we?
Today I am very much ready to bring you my full review of the Loreal Infallible 24 Hour Fresh Wear Foundation and I will let you know if I think whether or not it "made the grade".
I purchased the Loreal Infallible for $14.99 USD at my local Walmart. If you want me to be completely honest, I will say that the price is a little high. I think that they really need to keep the price in the $8-9 price range for drugstore foundations.
So I gave the price a C
I liked applying it with a damp sponge, although it works ok with a brush, but I find a very light coverage comes with the brush. So the sponge is where I find the best application.
So let's look at the claims:
Long wearing, up to 24 hours of wear: B
Twenty-four hours.......nope, that is not happening. First off I'd never wear foundation for 24 hours, but I will and do on the daily wear it from 5am until about 8pm. So I wear my foundation for about 15 hours. But, this foundation has a breakdown time of about 8 hours. Now, that is very normal for foundation on my skin. It is very rare that I can keep a foundation on without breaking down anywhere on my face much longer than the 8 hour mark. I think that the Revlon Colorstay will go for about 9-10 hours for me before it starts to fade and break down. The reason I give this foundation a B is because while it lasts the same as nearly every foundation I have ever tried....I did deduct points for the claims of 24 hours. That's just a silly claim.
Breathable: A
Yes, this is very fluid like, meaning it's very thin and watery but very light feeling on the skin. I completely agree with the statement made of being breathable.
Medium - Full Build-able Coverage: B
I won't go nearly as far as saying its a "full coverage". Build-able and medium are very true claims so I met in the middle of A and C and gave it a B. I like that you can get a light or medium coverage.
Three oil absorbents allow it to resist sweat, water and is transfer resistant: C
No, I can't say it's transfer resistant...I lost a lot of my foundation on people's shoulders when I was overly hugged at the funeral last week. I really put that foundation to the test then. I haven't came across sweating yet, its not that time of the year here in Texas so I can't lay claims on that one. As for water resistant...well it was decent. It's not hard to wash off, but it didn't run completely off of my face when crying a bunch last week. Just so you know, I have been using this foundation since the early part of January, but it got some real heavy duty testing last week at the funeral and visitation for my grandmother. I am a little confused about the "three oil absorbents"....to me that sounds like it should be made to control oil....however, it says no where on the bottle or website that it controls oil. Which is good because it doesn't do that at all. But I can't punish something when it doesn't claim "oil control". It is just a bit misleading to me.
Goes on smoothly: C
I wish this did better. I could see it just sinking into my pores and not looking too good. I did start to use a pore filling primer and that made it much better. So if you use a pore filling primer or you are just blessed beyond means and have baby smooth skin, then you will like the way it looks.
Healthy Looking: A
Yep, it is skin like in my honest opinion. I think because of how thin it is, is what makes it look just like your natural skin. In all honesty, it looks beautiful on the skin...but you just have to either have pore-less skin or use a pore filling primer.
Color stays true: A
Yes, again! While I really could have gone a shade lighter (I bought 425, Linen), it did stay looking true to color. It didn't oxidize at all on me, even throughout the wearing of it. The color didn't budge.
Another other thing that I wanted to mention before the final grade....this foundation takes a little while to dry down. I will turn a little fan on to help it to dry down some, but that is something to think about.
So what is the overall grade?
The Loreal Infallible 24 Hour Fresh Wear Foundation scored: B
I think that's a very fair score. It is not a terrible foundation, but it just needs to adjust the claims a bit, especially the 24 hour wear, and you might want to throw a primer under it. But I have continued to use it and I will finish the bottle up. I won't repurchase, but I am not disappointed by the product either.
So there you have it...my review and final thoughts on this foundation.
I hope you found it helpful and I also hope you will come back to visit me here at 523!
I will see you all again really soon, so until next time, take care.
-Kim
Subscribe to:
Posts (Atom)