Wednesday, January 30, 2019

Kokie Duo Metallic in Deep Sea Tutorial - Super Simple Eye Look


Happy Wednesday!!

It is cold, cloudy and dreary here in North Texas today....I'm not feelin' it today, for sure.  But, just like anything else, you gotta wake up, make up and then show up.  So that's just what I did.  Today, I'm am showing you a very easy look today, using only two colors of shadow.

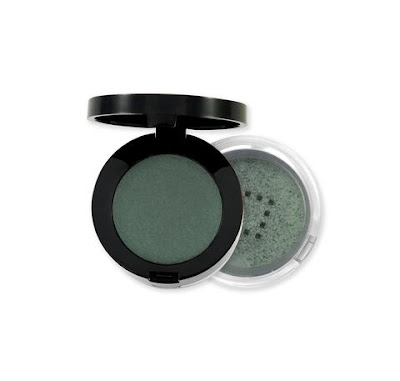
My featuring product is the Kokie Duo Metallic in the color Deep Sea.  Normally when i think "sea" I think blue in color, but this one is more of a forest green color.  Not that any of that really matters, but it was just a thought I had and decided to share....ok, let's hop to it.


First up, I want to let you know that there are two items to this product.  There is the cream shadow in the top lid and below that is the loose pigment.  I ONLY used the pigment in my look today.  I'm still playing with the cream....

But, you will notice that I took blotting papers and put them under my eyes.  One main reason is to catch the fall out that I have gotten each and every time I have used this little duo.  It's not as bad as my Rimmel pallets from last week, but it is still more than I care to clean up.  So use some tape, shadow shields or blotting paper, or just wait and do your foundation later.  But I decided to use blotting papers and another reason is because I like the sharper edge and it gives me a guideline as to where my shadows go.  So that's my reasonings...

I used a fluffy brush and swept the green all throughout my crease and concentrated it in the outer V of my eye.


Next, I used a pencil brush and ran the green color all along my lower lash line.


I then went into my highlighter drawer and fished out my Wet N Wild highlight bar in Earth and patted it all over the first half of my lid, just blending over to meet with the green.


Black eyeliner on the top lash line, many coats of mascara and the eyes are done.  I used the Rimmel Matte Liquid Lipstick in Blush for my lips and I use NYC blush in West Side Wine on my cheeks.


Apparently the NYC line is either going away or it's already gone and my Walmart hasn't got the memo yet....because I keep hearing about other makeup enthusiast saying they can't find NYC products anymore.  If that is the case then a good dusty rose blush color would work quite nicely.

But anyhow, here is the completed look...


Well, today's post is short and sweet....I have some studying and research to do for my Ecology class still yet so I must start that now.

Thank you all for visiting and supporting me, I will see you all again really soon.  Until next time, take care.

-Kim

Monday, January 28, 2019

Gimmick or Great? - Pizza Cutter Shaped Applicator for Liquid Liner


Hello and happy Monday!! Well, Caleb and I had high hopes of playing Bingo with my grandmother this past Saturday at the nursing home.  But when we arrived there was a note posted on the door saying "if your visit is not necessary, please reschedule, there is a viral illness in the entire building and we are trying to keep it contained". 

While I know Granny was really excited for us to come and Caleb was really excited to play Bingo with her, I knew that we had to turn away.  This will also keep us from going tonight on our normal visits to the nursing home, when Caleb reads to Granny.  It is sad, but I know that kind of illness is very serious and I don't want to risk Caleb getting sick, nor do I want Caleb bringing any outside germs to people who already might be sick and their immune systems aren't up to par. 

Well, that was what our weekend held....how was yours?  Have you ever been turned away from a place because illness ran rampant through the building?  I had never experienced this before, but this is the first year for my grandmother to be in a nursing home too.  So, I wonder if this is a normal procedure or if this is really some serious issue?  What do you think?

So, today we are going to talk about something I came across while cleaning up my makeup drawer the other day and it's inspired me to seek out this post idea a bit further.  So today I present my first of (I hope) many other posts on items that look like a gimmick item and either really are a gimmick or they are really great!

So, let's start!
I have been into makeup, skincare, bath and any sort of beauty products since early Jr. High, and I have seen plenty of items in my days.  Some really unique and innovating products and some just plain ridiculous and make you scratch your head wondering "WTF?"


Today we are going to determine if this eye liner that has a pizza cutter style applicator is one of those types of gimmick products or if it's really a great product.  The product I am talking about is the Butter London Stroke of Wow Roller Liner. 


I had received this in a Boxy Charm subscription a while back and decided to see how well it worked.  It looked almost scary to me when I first saw it.  I don't know if any of you have been cut by an actual pizza cutter before, but if you had, you'd be just as apprehensive of putting such by your eye, as I am.  LOL


I am mostly a drugstore cosmetics girl, so please know that you can get a liner applicator just like the Butter London one at Walmart by purchasing the Revlon Roll Liner, instead.  If this hadn't been sent in a subscription box, I'd never had purchased it.  So if this is intriguing to you, I'd say pick Revlon first.  BTW:  The formula of the Butter London isn't very good anyways so I'd go for the Revlon for that reason alone. Just in case you were curious.


But let's get started.  I'm not sure who thought this might be a good idea to put a thin roller as an applicator for liner.  I see some part of the idea because you can get a very thin line. 


 But, have you ever used a pizza cutter and tried to cut in circles or round out edges with it?  It doesn't always work like that.  This liner applicator, while it will make nice thin straight liner, will not go in a curved motion.  Such as the shape of my eye. 


I had to go in little swipe-y motions to allow for the curvature of my eye lid, and got a very choppy look from it.  This was not my first time using this on these photos either.  I had already been playing with it a few times this week trying to make it work.  I would think that if you are willing to put in the time and effort, there could be a learning curve you will need to learn.  Apparently I did not pick up that curve.


While I do believe you can get a nice thin line, I couldn't get this liner to get close enough to my lash line however.  You can see gaps where it should be on my lid, but isn't.  I like the brush tipped liners because the liquid on the brush will in a sense "fill in" the gaps of my lid. 


Ok, while I couldn't make this liner work for me, that doesn't mean it won't work for your.  There are 4 out of 5 stars on the Butter London site that the applicator is wonderful and has helped "newbies" to liquid liner, get precise wings and thin lines.  As always this is my personal experience from this product and yours might be very different, especially because all of our eyes aren't the same.  So it's up to you to decide if this is the product for you or not.  And while I can't say this product is "great" I can't quite say it's a "gimmick" either.  I think it's a lot like magnetic lashes, whereas you have to find the learning curve to making it work.

Well, that's all the makeup talk I have for today.  If you have tried this product or one like it, let me know, I'm interested to know if it works well for you or if you have any tips I may try out.

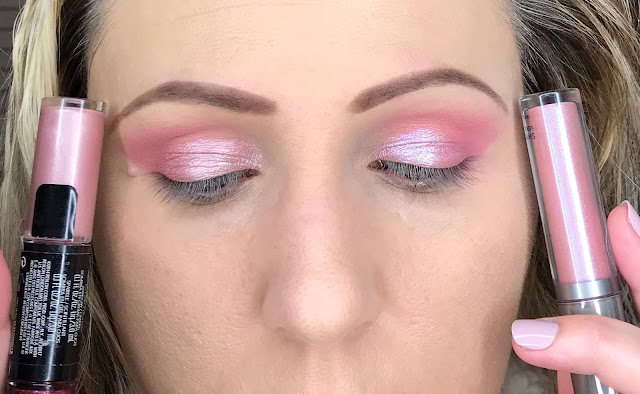
I will talk to you all again soon, and my next post will be the tutorial for the green shadow I am wearing in the above photos.  But until next time, take care.


-Kim

Friday, January 25, 2019

Dupe or Dud? - Cover FX Shimmer Veil - VS - Revlon Photo Ready Eye Art


TGIF!! Woohoo, it's Friday!!  How are you on this fantastic Friday?  I'm doing great here at 523.  I'm looking forward to a relaxing weekend with only one plan in mind....Bingo at the nursing home with granny! :)  We go each and every Monday to the nursing home and visit with my paternal grandmother.  They always have fun activities to do at the home, but she won't get out of her room to participate....she says "it's too cold".

While she really doesn't care much for the game of Bingo, she did say that if Caleb came up and wanted to play (because that is Caleb's favorite game) that she'd gladly leave her room and go play.  So, that's our plan.....B-I-N-G-O with G-R-A-N-N-Y.  What does your weekend hold for you?  Let me know below...I'd love to know.

So, today I am bringing you another "Dupe or Dud" post, where we will be comparing a $28 USD product to a $8 USD product.

While going through my makeup, I came across this Cover FX Shimmer Veil in Amethyst.  I think I received this in a subscription box and never opened it, but decided to see what it was all about.


It looked similar to a product that I already had on hand, which was the Revlon Photo Ready Eye Art in Fuschia Flash.


When looking at them in their containers they do not in the least bit look the same....however when I swatched them on my hand, they were extremely close looking. 

The Cover FX is the swatch on the right side and Revlon is on the left side.


So I decided to try them out on my eyes to see if there were any sort of differences when wearing them.  As you can see, however, there is a subtle difference in the way they look on the eyes.


The Cover FX (on the right) has more of a glittery purple hue to it.  Whereas the Revlon (on the left) has a more metallic finish and stays true to the pink color.  So they are not "dupes". 

While I'd normally say that I was sad they weren't dupes, I have to be honest...I actually don't care for the Cover FX.  I have worn this eye look for the past 3 days and all three days the Cover FX has been flaking off all over my face and falling into my eyes.  Not fun, nor comfortable!!

However, while I don't like the formula of the Cover FX, I do like the slight purple hue it gives.  So I decided to play around with some other stuff in my collection and I did find another product to add to the Revlon to make it look more comparable (minus the flaking) to the Cover FX.  I topped the Revlon with the Milani Hypnotic Lights in Beaming that cost $10. 


Together (Milani and Revlon) they made a good color and texture match to the Cover FX.  So for only $18 USD, I got the same look as I did with the $28 USD product and didn't have to deal with the flaking off!


I did try to use the Milani by itself, but it doesn't have a cream colored base....its almost like it's mostly shimmer that gives the color, not necessarily the base of the product.  When used alone it looked more like a wash of purple glitter on the eyes, nothing like the cream of the Cover FX.

In case you were curious, here is my full completed look.  I used the Rimmel Crimson pallet and applied the 4th color from the left throughout my crease, applied it heavier in the outer V and ran it on my lower lash line.  I used the Milani Blossomtime blush for my cheeks and for lips I used the Loreal Color Riche in Rose Gold.


 Anyways, I love finding less expensive ways to recreate looks!! It's puts a little pep in my step to do this...and it's not just makeup, I will do this with home furnishings, clothes, accessories, etc.   In fact I'm currently in the process of looking for a pair of earrings that had butterflies on them, that Meghan Markle, Dutchess of Sussex, was wearing not too long ago.


Obviously I cannot afford the ones she was sporting, but I can get really close to the look and not have to have the Queen's approval to buy them.  LOL

Anyways, that's all the makeup talk I have for today.  I hope you all have a beautiful weekend and I will see you all again really soon.  So, until next time, take care.

-Kim

Wednesday, January 23, 2019

Maybelline Brow Tint Pen Review - Does It Make the Grade?


Happy Wednesday!!

How have you been?  I was out on Monday, Caleb didn't have school, so I took that day off with him, caught up on my Ecology class and I also had to go to the nursing home and take care of my grandmother's laundry as well.  So I wasn't able to get a post out on Monday.  But I am here today to talk about a product that I had been trying out for a bit and have come to a conclusion on, so I wanted to share with you what I found.


I have been trying out the Maybelline Brow Tint Pen.  This is the one that is supposed to make the "hair like" strokes of tint to allow it to look like real hair for your brows.  The applicator has the comb looking tip that is supposed to be really good at making faux brows look real. 


This sounds like a real winner, especially for someone like me, who has very, very little brow hair.  I am one who has to basically recreate an entire eye brow each and every morning during my makeup routine.  So a product such as this should be a wonderful product for me.  Sadly, I can't say that it was a winner.

On the very first swipe of the product over my hand, it showed some really good results.  I was excited to try it out.  The color looked perfect and the amount of product was not too little and not too much...it was the Goldilocks effect...on the first swatch that is.


Sadly though, when I started to apply it to my brows, nothing came off.  The applicator was just scratching off my foundation and not leaving any product behind.  It was starting to hurt after trying to get the product out.

After scraping up my brows, I decided to see if it would apply to my hand again.  I was able to get a few more swatches until it dried up again.  It was like it was used up in those few swatches on my hand.  I was so sure that it wouldn't work any more, so I tried to apply it to my forehead....I know, it's teetering on the "odd side".  But I was frustrated and my eyebrows were sore.  Again, no such luck, it didn't even show up when I tried swatching it on my forehead.


So maybe it was the foundation?  Maybe it wouldn't go over foundation and so I went again on my hand....no such luck.  Apparently it was dried up at the tips and there I was with only one brow done.  I finally decided to try to see if any product would come out on the side of the pen.  I tilted the pen on its side and tried to use it that way, and some more of the product did come out.  So I used that to apply to the other side.  But because it was a large flat side, I got this straight broad line on my eyebrow that looked like I took a Crayola marker and applied it to my brow.  So I had to do some cleaning up.  Finally I just pulled out my Kokie brow powder and finished up the brows.


Each and every time I tried to use this brow pen, I always ended up pulling out my other brow products and saving the brows with them instead.  To say I was saddened is a very big understatement....I was in pain and mad.  This little product cost me $8 USD.  While that won't break the bank, I wouldn't throw 8-one dollar bills into my trash either and I feel as though I had just did that when I threw away this product.


My final thoughts are that this pen, while it could be that mine was a lemon and the others aren't this way, was a total fail.  There's no average grade to be made or "A" for effort, this was a complete and total "no show" of a product, not even warrant for any sort of letter grade. 

If you have tried this product, please let me know what you think about it.  I want to know if I got a bad one or maybe it's because I was using over foundation?  But whatever your thoughts are, I'd love to know.

I hate doing bad reviews, unfortunately they are necessary if I am going to be honest.  Off hand I cannot think of the last time I actually threw away an item.  I usually like to find ways to make things work, but I just couldn't with this brow pen. 

So those are my thoughts.  I hope you found it informative in some way and will come back and visit me again here at 523!  I have a lot more reviews coming soon, I have been playing around with quite a bit of new makeup.  So I'm excited to share more tutorials and reviews soon.

But for now, that's all I got.  I will see you all again soon.  Until next time, take care.

-Kim
Friday, January 18, 2019

Swatches / Looks / Final Thoughts on Rimmel Electric Violet Pallet - Did It Make the Grade?


Happy Fri-YAY!!  I'm excited for this weekend...its Caleb's Cub scouts pinewood derby race tomorrow!! Caleb and the hubs are both really looking forward to see how well their car does.  They have both worked so very hard and long on building their car, so the anxiousness is quite high.  But you didn't come here to talk pinewood derby cars....you came for the girly stuff, am I right?

So let's do this.  I am going to give you the completed looks, swatches and my final thoughts on if this pallet makes the cut.  I hope you enjoy.
I have done 4 looks with my Rimmel Magnifique Eyes Pallet in Electric Violet.  My grade for the multiple looks one could get with this pallet is most definitely an "A" for the grade book.  I know you could come up with many more looks than what I did, using this pallet.  I'd like to play around and do a very, very deep smokey eye soon.  But for now, here's the 4 looks I made.


I have swatched it three different ways, one using my finger, one using a dry brush and one using a brush with setting spray. 

As you can see the setting spray and my finger make absolutely no difference in swatches.  So I gave this another "A".


Then when you compare to the dry brush swatches, you will see a substantial difference.  For these swatches I gave the pallet a "C".  They are way too sheer and lack the pigment that I know Rimmel can do, even with a dry brush. 


Just as a side note, I do not base my thoughts on how it performs with my finger.  I don't like using my finger as a tool for makeup application so its not something I will use.  However, because I am good with using a setting spray to deepen the intensity, I will put that into play when determining how I feel about the shadows. 

Remember, these are just my own personal thoughts on this and you will want to take your favorite application method into consideration when deciding which pallets to use.

Staying power is ok, when the shadows are dry.  I noticed fading about mid day throughout the look.  But when applied wet, the staying power amps up to being nearly all day without any sort of fading.  So I gave the staying power a "B". 

Let's talk texture in these shadows.  They are soft shadows so you must expect fallout.  While I do expect the fallout, I do NOT expect this much.  I have worked with hundreds of shadows over the years and even including the other Rimmel Magni'figue pallets and still have never had this much fall out.  Here's where I'm having to wipe the fall out off my face, that was already finished with foundation and powder.


So unfortunately I actually failed this part of the pallet with a "F".  I know it's harsh, but it gets better..... 

Because they are very soft eyeshadows, this does allow them to blend out so very nicely....in that case I gave them an "A".  This is actually a very user friendly pallet, in my opinion because they blend out so beautifully.

Alrighty, last item is price.....at $10 USD, you cannot get any better....well ok, so Wet N Wild may have some pallets cheaper but no one else does.  I had no problem paying the $10 for this pallet, therefore I gave the price another "A" in the grade book.

Now we get into my final thoughts and what overall grade was given on the pallet.  I actually averaged out each letter grade and came up with the total score of a 3.14, which basically makes this pallet a "B".  Not too shabby, if I do say so myself.


  I do really enjoy this pallet and had such fun using it.  While I don't like the sheerness of the shades dry, I know I can amp them up to a whole other level with a little setting spray.....and to be honest, they are killer shades when used with a setting spray. 

I do think the sheerness of the shadows will aid in anyone who is new to using color or even makeup in general because it won't be quite so overwhelming of pigment and it's pretty hard to screw it up dry.  So this pallet can be very versatile and I love that about a pallet. 

My only huge con with this pallet is the fallout.  I can't get over just how much there is, even after tapping off my brush.  I am not one who likes to do face makeup last so this is one hard thing for me to get past when using this pallet.  But if you don't mind using shadow shields or applying your foundation after the eye look is complete then I think this would be an great purple pallet to use.

So there you have it....my thoughts and final grade on the Rimmel Magnifique Pallet in Electric Violet.

I hope you enjoyed today's post and found it helpful.  If you have any questions please let me know, I am happy to answer them.

Thank you for visiting me here at 523, I will be back again next week with some more good stuff to talk about.  I hope you all have an amazing weekend!! Until next time, take care.

-Kim

Wednesday, January 16, 2019

Soft and Easy Look using Rimmel Electric Violet Pallet


Hello and welcome to Wednesday here at 523!! How has your week been?  Mine has been great!! Caleb and Brad are complete with their pinewood derby car for this Saturday's upcoming race, and Brad also was asked to cut out another boy's car, so he completed that in one evening and we got it back to the scout the very next day.  So we are all excited for the upcoming race!!

While watching a Youtube video the other day, I had seen a beauty vlogger wearing a pretty light and neutral eye look.  While watching her channel a bit more, she expressed her hopes that more bloggers and vloggers would incorporate more wearable and lighter eye looks, while still using color.  It got my wheels turning.  While I have no problem wearing a bold eye look and will sport it most anytime, I have to also realize that it's really not the "norm" for most women.  And though I am still going to do my own personal "normal" looks, I also want to appeal to more women, if possible.

With all of that said, I decided to do a more lighter "colorful" eye.  Being that while many women want to have a lighter looking eye look, they don't always want to do the usual brown or taupe color either.  So that's what we are doing today.  I am going to show you how to get a more colorful but still toned down eye look. 

  I hope you enjoy!!

We going to take color #4 on a fluffy blending brush and starting with the outer corner, start blending it out.  You want a little bit heavier application in the outer V (outer corner from lid to crease area that makes a "V") and blend it over towards the crease.  The majority of the product needs to be in the outer V and the rest to be sheered out in the crease.


Then I went in with color #3 (actually you could take any of the lighter shades) and I packed it all over the lid.


I next used a very fine angled brush and used color #11 to line my upper lash line.  I decided to forgo the black liquid liner to give an easier option for anyone who doesn't use that kind of liner.  This will basically deepen right at the root of your lash line and it makes your lashes fuller. 


After using a nude pencil in my lower water line, I then smudged color #4 all along my lower lash line.


I then curled my lashes, applied three coats of mascara and then went for the cheeks and lips.  I used Milani's Blossomtime Rose blush and Covergirl's Lipcolor in Divine for my lips.


And then my look was complete.   What do you think?


I like how easy it was to do this look and how very quick it was as well.  What do you think of the lighter eye look?  Or are you more of a bold eye look kind of person?  Me personally, well I will sport them both ways!! But that's just me....

So, I think I have done all the looks I care to do using the Rimmel Electric Violet pallet.  My next post will be my final thoughts on the pallet as well as the swatches from a variety of application techniques.  I will let you know who this pallet is good for and who might should steer clear (if anyone). 

I hope you have a fantastic Wednesday, and I will see you all again really soon!! Until next time, take care.

-Kim

Monday, January 14, 2019

Bold and Colorful look using Rimmel's Electric Violet Pallet


Hello and welcome back!! How has your Monday been so far?  Mine has been good.  I am so relieved that the Sunday school class is over with.  If you recall last post, I said that Brad and I were asked last minute to teach our Sunday school for our church.  This is not easy because we were only given a few days to prep and we have to fit an entire month's worth of lessons into one class.  We don't have the typical every Sunday, Sunday school.  There aren't enough volunteers to teach the classes so we only have them once per month.  But anyways, that is over with for now and we only have two more classes to teach before it's all over with.  And hopefully we will get the lesson much quicker this month so we have more time to prepare.

So, let's again, talk about the Rimmel Electric Violet pallet....I have done two other tutorials on this pallet and today I wanted to bring you a very colorful and fun look.  I got so many compliments with this look and I had such a fun time creating it.  I hope you enjoy!

First up we are going to start out with our crease color and really the best color in this pallet for that is the color #2.  So run that all throughout your crease.  I did use blotting papers on the outer corner of my eye so I can have a guideline to keep my shadows in the upward and outward on my lid.


Next we are going to work on the lid area and will be back again at the crease soon.  But I got some of the teal color #8 on a flat brush and spritz it with setting spray and packed it on the inner third of my lid.

 I then went in with another flat brush, color #6 and spritzed it as well, and packed it on the middle third of my lid.  You want to slightly overlap the teal color to allow it to blend with the middle purple shade.


Last on the lid, I went in with the blue color #12, and setting spray and packed it on the outer third of my lid.  Again, slightly go over the middle shade where it meets the blue to make it blend together.

Now I went in with a smaller blending brush and color #4, I used this one dry.  But I swept it on the lower crease area, all along the top of the edges of my lid colors.  This allows the lid colors to blend up into the crease with this purple color.


Now we are going to work on the lower lash line.  You will do the exact same thing as you did on the lid.  Take color #8 on the inner third of the lower lash line, run color #6 in the middle and color #12 on the outer third.  This will blend them all together and give you a nice gradient affect.


I decided to go bold today and used black pencil liner on my lower inner rim, my usual black liquid liner on the top lash line, mascara and then I topped it all off with some false lashes.  The lashes really amp up a bold eye look!


For my lips, I lined them with Wet N Wild Bare to Comment gel liner and used the Maybelline lipstick in Pearly Pink.  Lastly, I used Loreal's Blush in Baby Blossom to finish off the look.


And there you have it.  A very colorful and bold look using the Rimmel's Electric Violet pallet. 


I hope you enjoyed today's post using this pallet.  I had thought that perhaps some would like to see a more easy, neutral and wearable look using this pallet and have been playing around with that.  I haven't been happy with the looks yet, so I'm going to keep trying.  But for now, that's all I got.

I hope you all have a great day and will come back and see me again here at 523!! Until next time, take care.

-Kim